Introducing another addition to our portfolio of minimalistic tools for pentesting. This time we are going to be looking on a minimalistic TCP and UDP port scanner.
Written in pure PowerShell, this small yet powerful port scanner is useful in specific attack simulations where we cannot use any traditional or typical port scanners.
Introduction
There are many network port scanners out there. Some of the most popular ones include Nmap, Masscan, Angry IP Scanner, ZMap any there are plenty of others.
They are all great, well tested and functional, but they are also big, complex and most importantly flagged by every decent Antivirus or EDR solution. And that can be a deal breaker in some penetration testing scenarios.
In some situations we simply need something small and minimalistic, something that we could write from scratch quickly, if we needed to.
Why writing port scanner from scratch?
Writing tools from scratch may be necessary, for instance, when we are performing pentest from a heavily restricted environment where we cannot use any typical pentesting tools.
This would be vital while testing of an isolated VDI / Citrix environment where we cannot upload anything or when we are performing a simulation of a disgruntled employee from a workstation with all the security controls in place.
In all these cases we would need to build our own tools in order for us to be able to perform basic operations such as port scanning.
Without port scanning abilities, we would hardly be able to make any progress, discover systems on the network, or perform any lateral movement for that matter.
Port scanner is simply a must and if we cannot use one, we have to make one.
TCP and UDP port scanner in PowerShell
For such occasions, I have developed the following quick and easy, but powerful and reliable port scanner.
To keep the size small, I have divided the scanner into two separate independent modules:
- TCP port scanner: port-scan-tcp.ps1
- UDP port scanner: port-scan-udp.ps1
So it’s really two port scanners, not one. Both scanners can be found in the following GitHub repository:
List of features
Both port scanners have the following features:
- Detection of open, closed and filtered ports (both TCP and UDP)
- Ability to scan a single host, network range or a list of hosts in a file
- Adjustable timeout values for effective and reliable port scanning
- Non-malicious – undetected by any Antivirus or EDR solution
From the design point of view:
- Small and minimalistic – can be typed out by hand (on the keyboard)
- Written in pure PowerShell – no additional modules needed
- Practical and smart design:
- Support resuming, if interrupted
- Skip already scanned hosts / ports
Let’s have a look on how to use these scanners.
Typical usage scenario
Since the port scanners are written in PowerShell, we have to be able to run PowerShell commands on the system that we are using. On a restricted workstation this may a be a problem, so..
(1) First step is typically to circumvent the restrictions and spawn a shell. Once we can comfortably run PowerShell commands, we can progress to the next step.
(2) Now we can write up the port scanners somewhere on the file system. For instance, we could place them on our Desktop, but due to various restrictions we may have to place them somewhere else where we can write, e.g.:
- C:\Users\Public
- C:\Windows\Tasks
- C:\Windows\Tracing
- C:\Windows\System32\Spool\Drivers\Color
- etc.
And that’s all!
Now we can start doing some port scanning. Here’s a quick intro into how to use them.
TCP port scanner:
Import-Module .\port-scan-tcp.ps1

# Usage:
port-scan-tcp <host(s)> <port(s)>
UDP port scanner:
Import-Module .\port-scan-udp.ps1

# Usage:
port-scan-udp <host(s)> <port(s)>
Let’s see some examples on how to use them in practice.
Port scan of a single host
Here’s the simplest example – check if a remote host has port tcp/445 open:
port-scan-tcp 192.168.204.183 445
Here’s an example of port scanning a single host for selected tcp ports:
port-scan-tcp 192.168.204.183 (21,22,23,25,80,443,445,3389)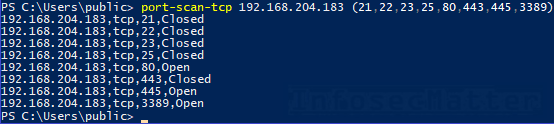
Port scan of a network range
Here’s an example of port scanning a network range 192.168.204.0/24 for port tcp/445 (port sweeping):
0..255 | foreach { port-scan-tcp 192.168.204.$_ 445 }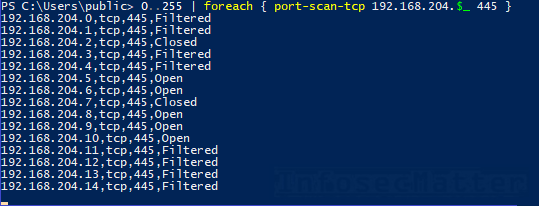
Here’s an example of port scanning a network range 192.168.204.0/24 for selected tcp ports:
0..255 | foreach { port-scan-tcp 192.168.204.$_ (22,80,445) }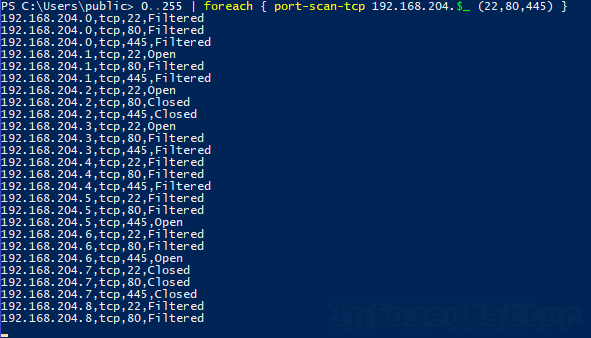
List of hosts in a file
We can also provide list of targets as an input file.
For instance, in corporate networks with Active Directory (AD) deployment, we could extract list of computers from AD using PowerShell cmdlets like this:
$a = [adsisearcher]”(objectCategory=computer)”
$a.PropertiesToLoad.add(“dnshostname”) | out-null
$a.PageSize = 1
$a.FindAll() | % { echo $_.properties.dnshostname } > computers.txt
Now we could identify all alive Windows systems by port sweeping on port tcp/445:
port-scan-tcp (gc .\computers.txt) 445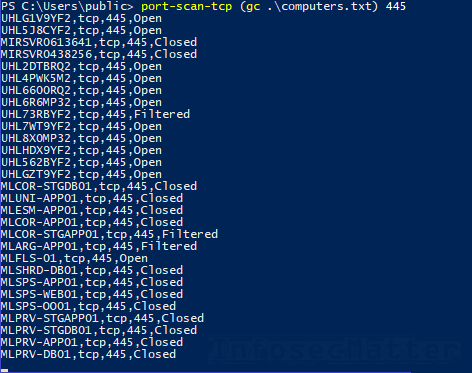
Getting the results
Both scanners keep track of everything using a state file (scanresults.txt) which is created in the current working directory. This allows us to check on the results anytime, even during ongoing scans.
For instance, here’s how we can get a list systems with port tcp/445 open:
Get-Content .\scanresults.txt | Select-String "tcp,445,Open"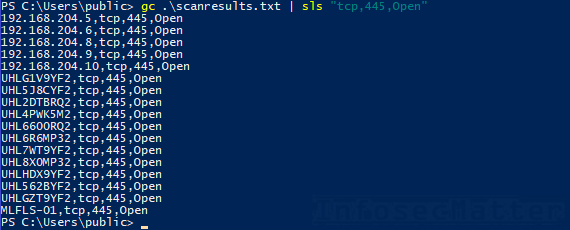
If we wanted to list only the first column, we could easily do that with PowerShell like this:
(Get-Content .\scanresults.txt | Select-String "tcp,445,Open") -replace ",.*",""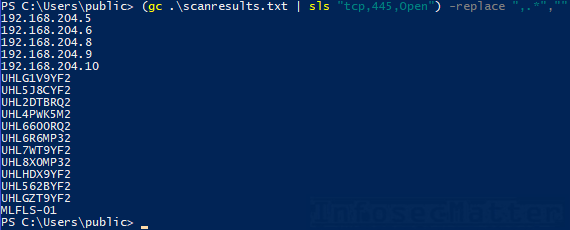
Now we could feed this list into our SMB login bruteforcer, for instance, and attempt to compromise some of these Windows machines. Or we could employ some other automation, anything we would like.
Requirements and limitations
Compatibility. The TCP scanner comes in two versions with the difference of using the TcpClient.ConnectAsync() method. This method, available in .NET 4.5, gives the scanner ability to discern between ‘Closed’ and ‘Filtered’ ports. The compat version of the scanner (for older systems) cannot discern this and just reports both such cases as ‘Closed’.
Speed. Both port scanners (TCP and UDP) are only a single threaded loops without any parallelization. Thus, the scanning speed is limited. But, in the worst case the speed should be around 1 port scan per second, depending on the timeout values which you can also simply just change.
Speed degradation. Something to also keep in mind is that the scanners may get a bit slow after some time if there are too many results already. To mitigate this issue, we can rotate the results file or use a different one by modifying the modules and reloading:
Import-Module .\port-scan-tcp.ps1 -force
Import-Module .\port-scan-udp.ps1 -force
Conclusion
Although these port scanners are not perfect, in some situations they are exactly what gets the job done with a nice feature list and compact form.
Hope you will find them useful too sometimes!
If you like these tools and you would like more like it, please subscribe to my mailing list and follow me on Twitter, Facebook or Github to get notified about new additions!
See also
- Active Directory Brute Force Attack Tool in PowerShell (ADLogin.ps1)
- Windows Local Admin Brute Force Attack Tool (LocalBrute.ps1)
- SMB Brute Force Attack Tool in PowerShell (SMBLogin.ps1)
SHARE THIS


MOST VIEWED TOOLS