During penetration tests, attackers often times gain access to various administrative interfaces and management consoles. These interfaces can consequently contain credentials for other systems in the network, as they are integrated together. Credentials are of course very valuable for every penetration tester, however they are typically hidden under dots and cannot be just simply copied. How to get them? In this article we will discuss several methods how to get them.
Disclaimer: All screenshots has been redacted and/or modified.
Administrative interfaces
What administrative interfaces are we talking about here? We are talking about any kind of management interface of any network device, system or network appliance. Some examples:
- Firewall
- Network printer
- Security appliance (IDS/IPS)
- Wireless access point
- Information system (SAP, Oracle)
- Inventory management solution
- Server management console
- Storage system
The list goes on. The possibilities of what can be encountered during a penetration test are practically endless. Alright, but..
How attackers get into these administrative interfaces?
Part of every decent penetration test should be ensuring that all systems and devices on the network are properly secured. Penetration testers therefore try to gain access to these systems by any of the following methods:
- Trying default credentials
- Guessing the password
- Performing login attack using a dictionary
It is almost always the case that some systems on the network get compromised this way. Especially in large organizations it is usually very challenging to keep solid security posture of every single device and system connected to the network. Sometimes however, hackers can gain access also by:
- Stealing session cookie via some kind of client side attack or MITM attack
- Finding credentials during post-exploitation phases
Alright, let’s jump right to it and see some real world examples from our pentests.
Case 1: Riverbed RPM Dashboards
During one engagement, we found a Riverbed RPM Dashboard appliance configured with default credentials (admin/password). This software is a network management and monitoring solution used to manage devices on large networks.
After a brief examination, we found the following systems (‘Data Sources’) integrated within the Riverbed RPM Dashboard:
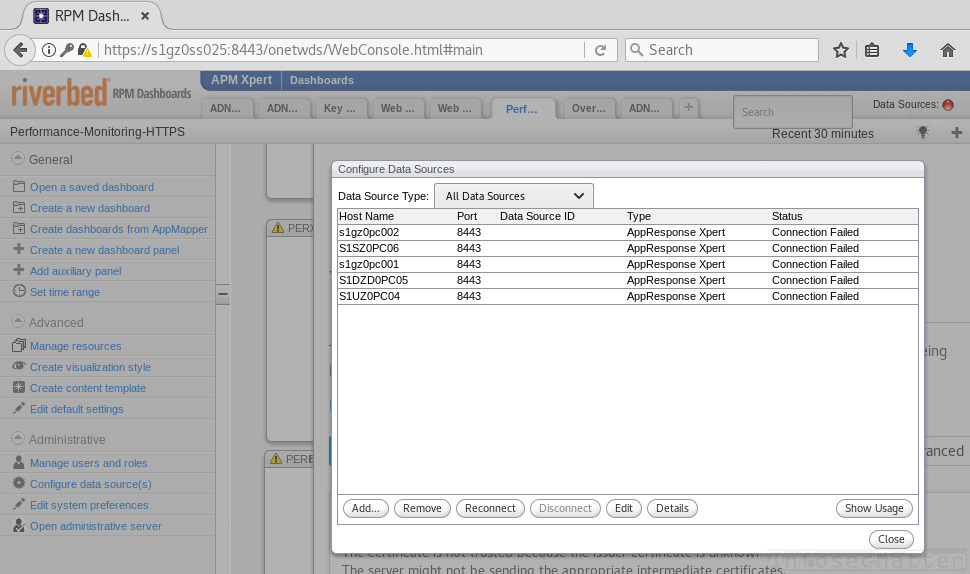
After clicking on them and clicking on the ‘Edit’ button, we could see that there are passwords stored in each configuration window:
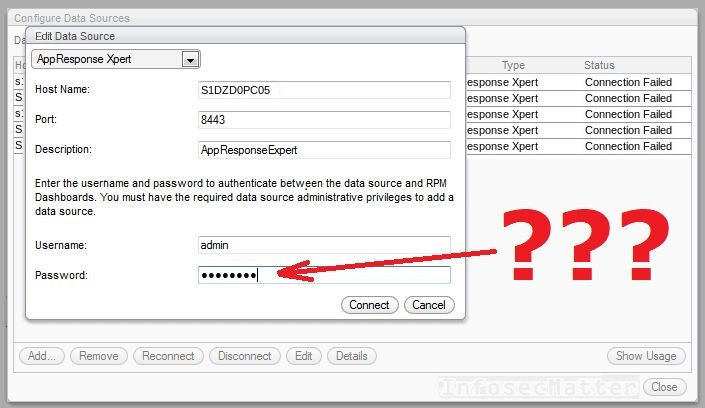
But we cannot see the password – we only see dots. How can we reveal the password?
Password reveal method 1: Intercepting proxy
The first thing we can try is to use an intercepting proxy and inspect the traffic between our browser and the application. We want to find out whether the application actually sends the password to our browser and merely obfuscates it for us in the browser. For this task we could use tools such as:
- Burp suite
- Fiddler debugging proxy
- Browser developer tools (F12) and its Network tab.
So once we are intercepting the traffic, we can click around, click again on the ‘Edit’ button and then..
Inspect the traffic
Now we simply have to inspect the proxy logs and look for the password. In our particular case the password was indeed sent to the browser, as we can see here captured in the Burp proxy logs:
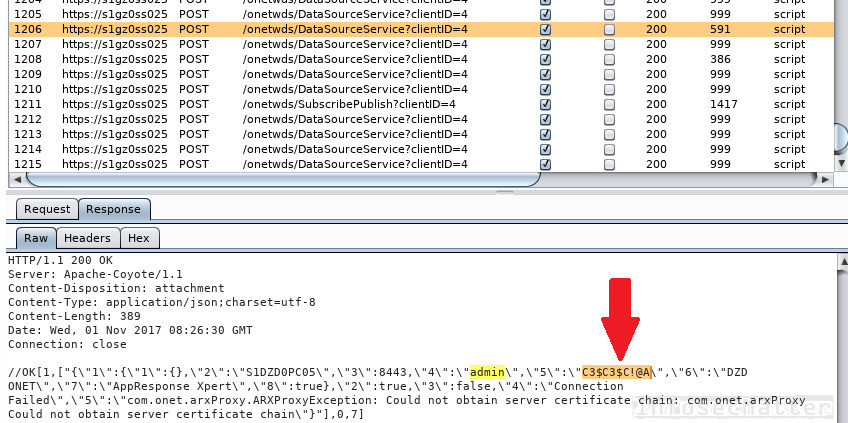
How is that possible, you may ask? That’s because the Riverbed RPM Dashboard actually uses only the most basic HTML input field password type obfuscation. We only see dots in the browser, but under the hood the application sends the password into our browser in a clear text format (albeit over HTTPS).
But wait, it cannot be that easy!
You are right – it is very rare to come across such an application today. On the other hand, old applications and legacy systems still exist within organizations even today. It could also be a custom made application designed without security in mind. One never knows, but we should always try to use intercepting proxy.
Ok, so what to do in those other 99% cases when the application is not from dark ages? Let’s see another example..
Case 2: Kyocera network printer
In another penetration test, we discovered multiple Kyocera network printers configured with default password (Admin/Admin). Printers often times lack the attention of pentesters, because they are generally considered as unimportant assets. But we should always investigate..
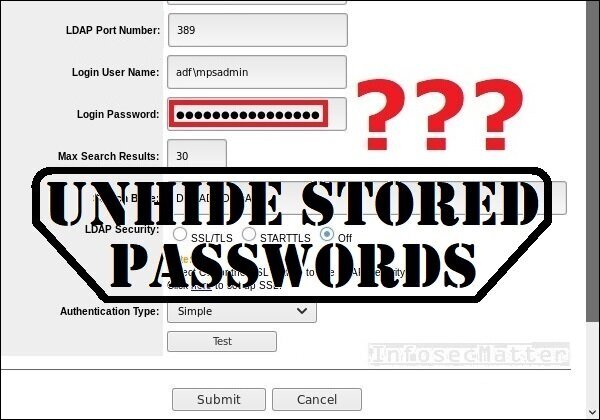
By looking around the settings section, we found that the printers were integrated with the corporate Active Directory using LDAP protocol. And we saw a password in there hidden under dots:
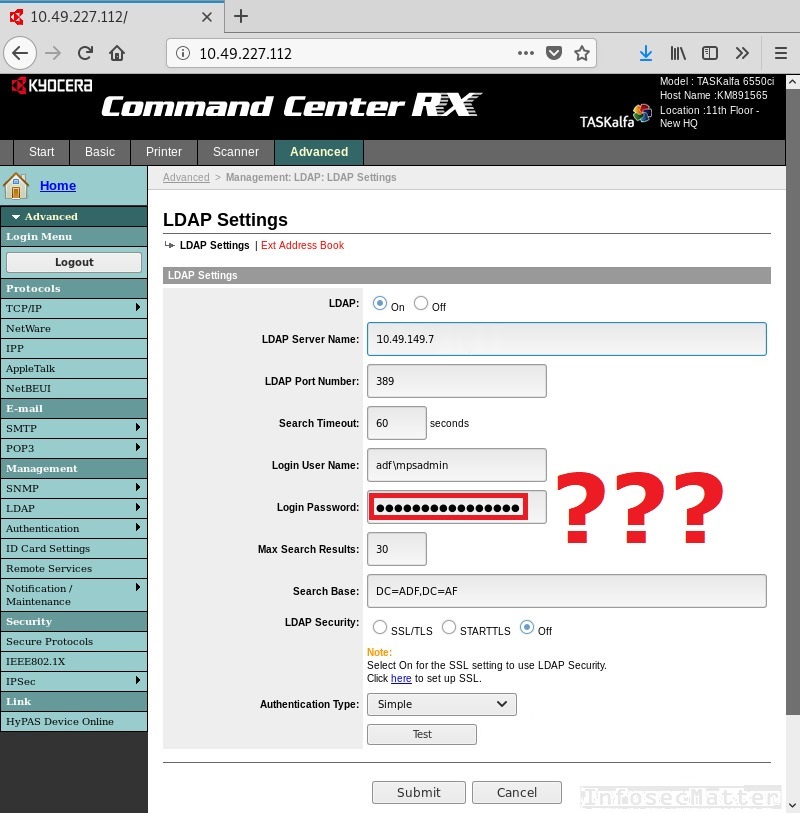
Naturally, we fired up a proxy and pointed our browser to it. We clicked around, but we couldn’t find the password anywhere in the proxy logs. The password was simply not being transmitted over the network! In this case the password was well protected within the interface. Can we do something to reveal the LDAP password? Hold my beer..
Password reveal method 2: Rogue LDAP server
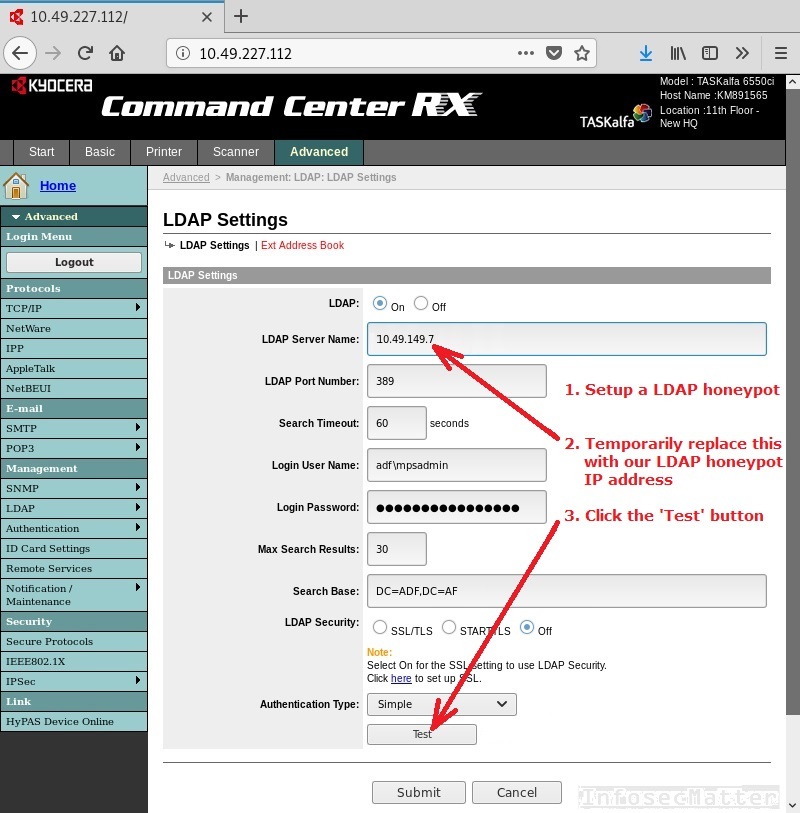
To reveal the password, we can simply setup a rogue LDAP server on our machine and make the printer try to authenticate against us! That means, we would:
- Setup a rogue LDAP honeypot server on our machine
- Temporarily replace the address of the LDAP server with our machine
- Click the ‘Test’ button
The following screenshot illustrate this process in somewhat better detail:
Now there is only one requirement in this plan – the printer has to be able to reach our rogue LDAP server. Therefore, we need to ensure that we are not going to be hidden behind NAT or that there is no firewall in place. The printer simply has to be able to reach us on the specified port tcp/389.
Setup a rogue LDAP server
For setting up a rogue LDAP honeypot server for our purposes, we don’t actually need a real LDAP server. We can simply use the Netcat (nc) utility and start listening on port tcp/389. I’m pretty sure Netcat needs no introduction if you are reading this blog. Simply start the listener like this:
sudo nc -nvlp 389- -n (numeric-only IP addresses, no DNS)
- -v (verbose mode)
- -l (listen mode)
- -p (port 389)
Now after clicking the ‘Test’ button, the printer will try to authenticate against our Netcat listener and reveal the stored LDAP credentials to us on a silver plate:
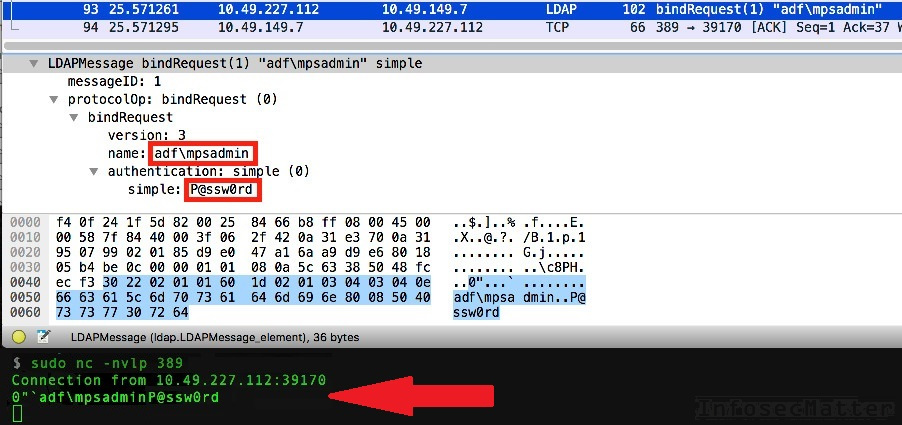
There we have our hidden domain user account credentials revealed in a plain sight! Now we could go ahead and start doing authenticated enumeration of the corporate Active Directory domain. Interestingly in this case, the user ‘mpsadmin’ was a member of the ‘Domain Admin’ group! This was of course critical issue, but that’s a whole another story. Let’s stay focused on our topic and move on to another example.
Case 3: FireMon Firewall Management
In yet another pentest, we managed to guess credentials for a FireMon Administration interface. We learned that this is a product for simplifying firewall management in larger environments. After navigating around the interface, we found that there are other systems (devices) integrated with it:
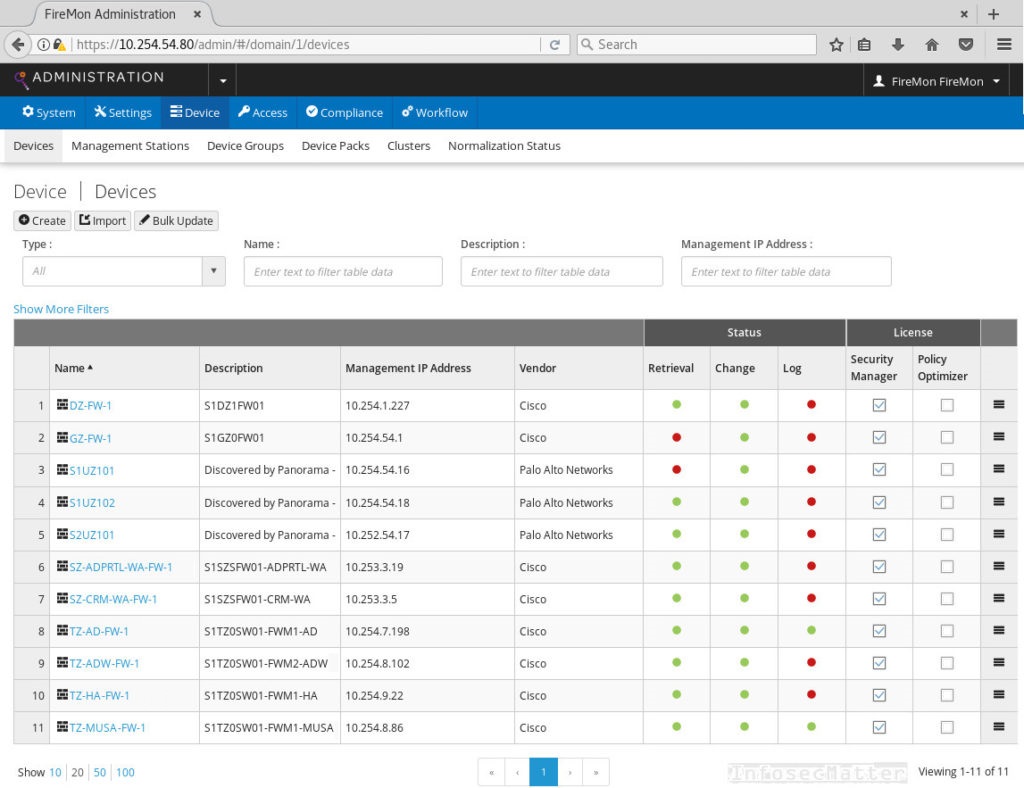
After clicking around, we found that we can edit settings of those devices. We found that there are SSH passwords for each device stored within the interface. But again, we could only see dots:
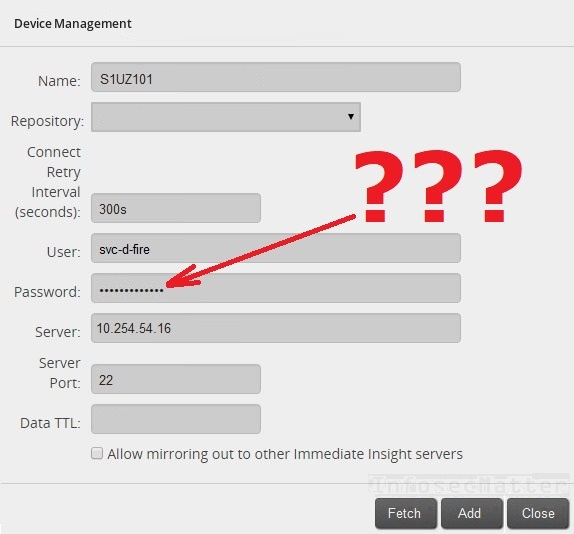
Can we find out the password? Testing with intercepting proxy showed that we are out of luck again – the FireMon interface handles the credentials securely and keeps them on the back-end at all times. There is no way we can find the credentials in the proxy logs. How can we reveal the password in this case? Hold my whiskey..
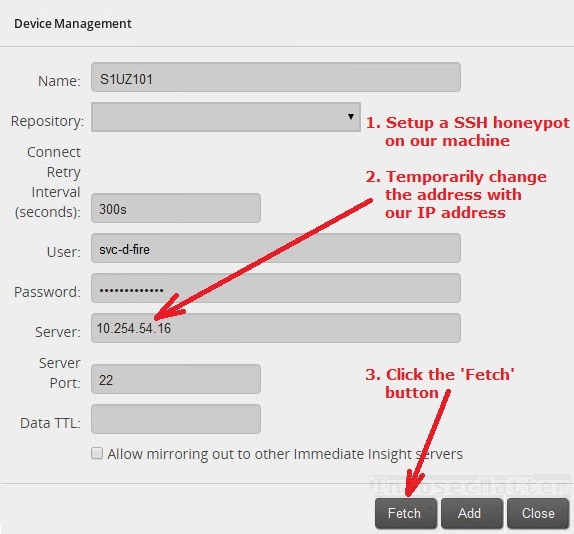
Password reveal method 3: Rogue SSH server
In this case we can proceed similarly as in the previous case – we will setup a rogue SSH server on our machine. And then we will make the FireMon management appliance authenticate to us. So our plan is to:
- Setup a rogue SSH server on our machine
- Temporarily replace the address of the target server with our address
- Click the ‘Fetch’ button
The following screenshot illustrate this process in more detail:
If the plan goes well, after clicking the ‘Fetch’ button we should receive the password, right? The only thing is that we need a tool to capture the SSH password in a plain text format and that could be a problem. But don’t worry – we don’t have to start modifying the OpenSSH sources. The Cowrie honeypot is here to help us with the job!
Setup a rogue SSH server with Cowrie
Cowrie is a SSH and Telnet honeypot designed to log brute force attacks and log the shell interaction performed by attackers. It can completely emulate a UNIX system and can also act as a proxy server to observe attacker behavior when connecting to another system. Cowrie is all round an amazing tool to have in the arsenal. It was written by Michel Oosterhof.
For our purposes, we will only use Cowrie’s capabilities to show us the SSH login credentials. In order to set it up on any modern Kali Linux installation, perform the following steps:
# (1) operate as non-root user
adduser myuser
su myuser
git clone http://github.com/cowrie/cowrie
cd cowrie

# (2) install all dependencies as root
apt-get -y install git python-virtualenv libssl-dev libffi-dev build-essential libpython-dev python2.7-minimal authbind
pip install -r requirements.txt
pip install twisted==17.9.0

# (3) start the SSH server (it will be started on port 2222)
bin/cowrie start

# (4) to capture the credentials:
tail -f var/log/cowrie/cowrie.log

# (5) do port forward as root
socat TCP4-LISTEN:22,reuseaddr,fork TCP4:127.0.0.1:2222
Now when Cowrie is up and running , we can change the server address in the FireMon interface and make it point it to our rogue SSH server. Then, after clicking the ‘Fetch’ button the FireMon will try to authenticate to our SSH server and Cowrie will capture the credentials for us. Indeed:
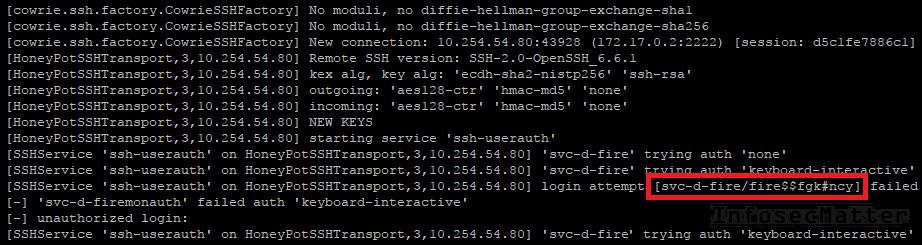
Now we got ourselves another credential to work with and another evidences to put into our report.
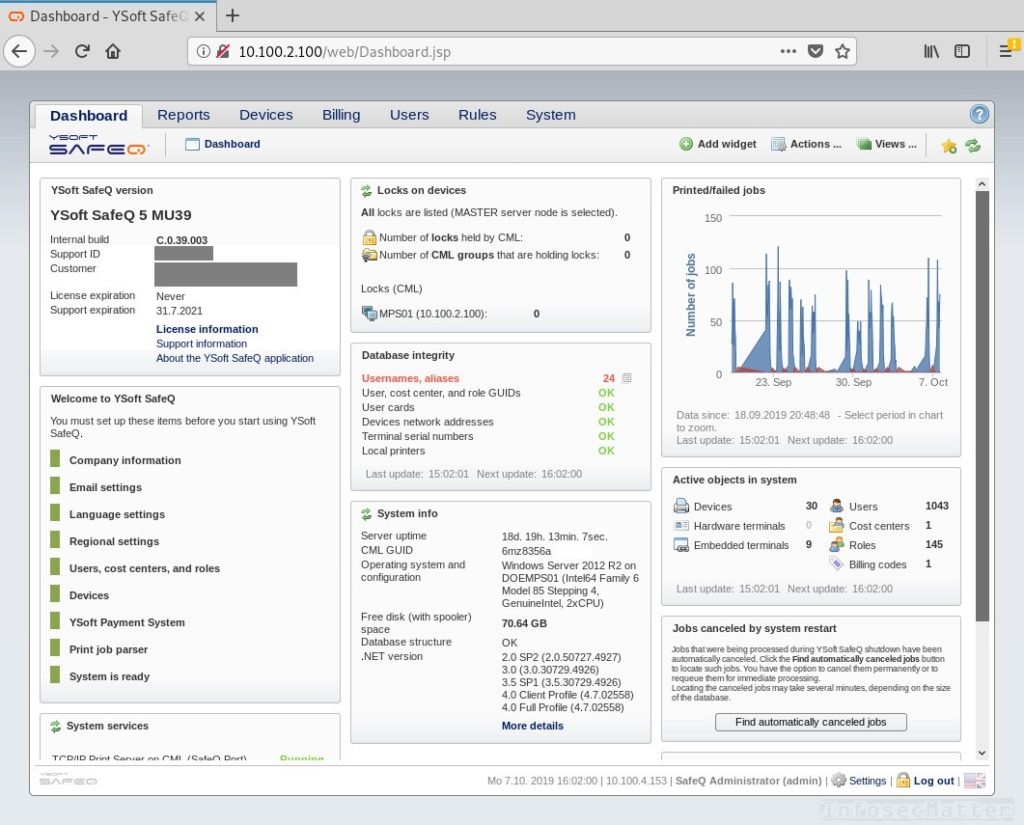
Case 4: YSoft SafeQ Printer Management
For our last example, let’s get back to our favorite printers again. Printers are everywhere, aren’t they? And they are so overlooked by the pentesters! Anyway, in this penetration test we encountered a YSoft SafeQ Printer management interface. After the first login attempt (admin/admin) we were in:
After clicking around a bit, we navigated into the ‘Email settings’ and found that it was integrated with the corporate email server so that people can scan and receive emails from it. But you know it – the credentials were hidden under dots again:
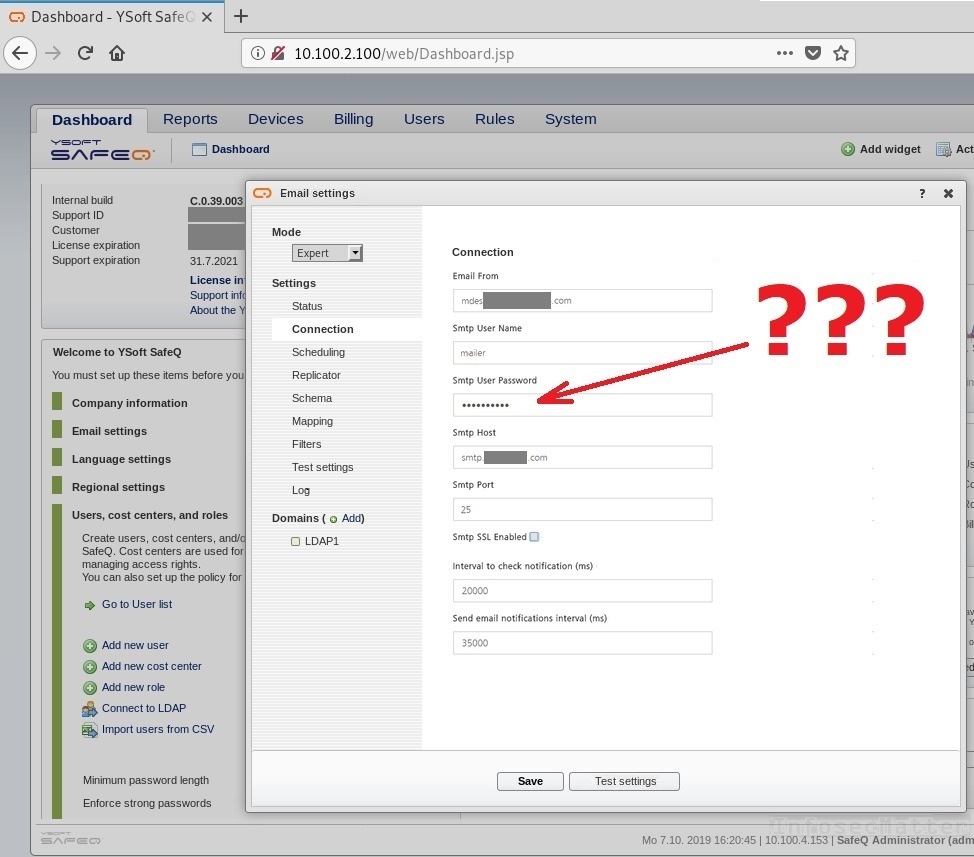
The YSoft SafeQ looked like a fairly modern software, so our hopes for revealing the SMTP password using a proxy server were quite low. And indeed it was a futile attempt, but as pentesters we simply always have to try. So how can we get the SMTP password in this case? I think it will not surprise you, but here we go.
Password reveal method 4: Rogue SMTP server
We will use the same strategy as in the previous rogue methods. We need to, step by step:
- Setup a rogue SMTP authentication server / honeypot on our machine
- Temporarily replace the address of the Smtp Host with our machine
- Click the ‘Test settings’ button
The following screenshot illustrates our strategy:
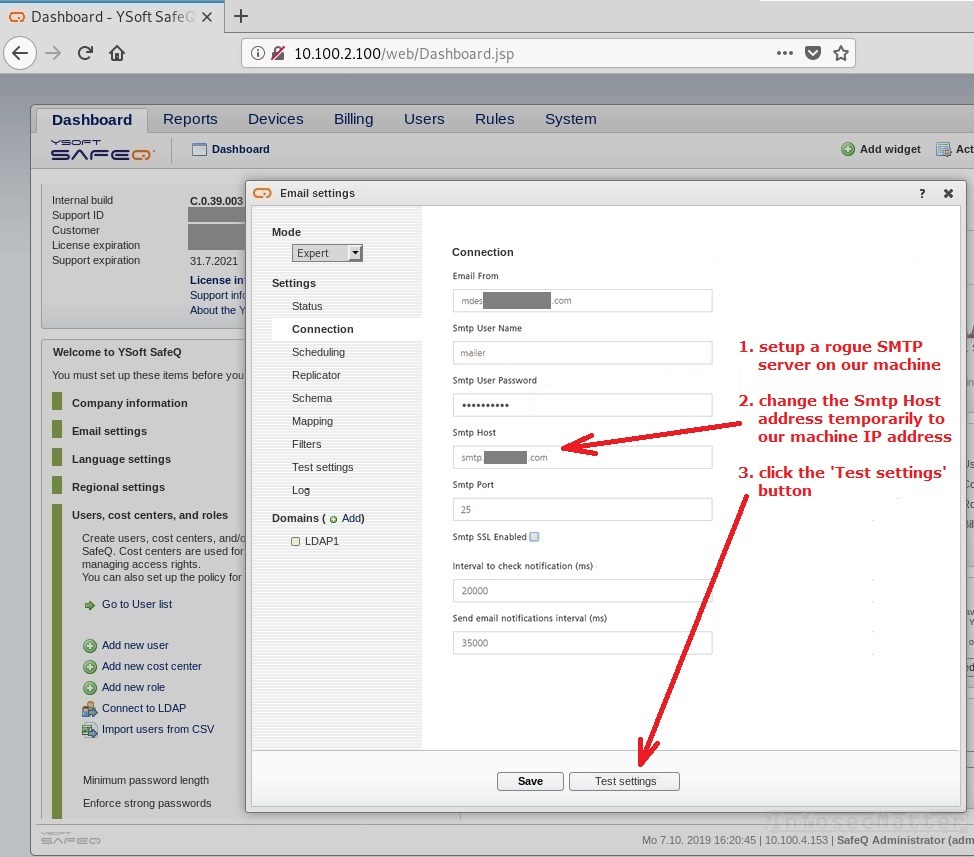
Ok, the plan is clear. The only requirement is again that the remote system can reach us on port tcp/25, where our rogue SMTP honeypot is running. Alright, let’s proceed.
Setup a rogue SMTP server with Responder
In this case we will use the Responder tool. Responder was written by Laurent Gaffie and it is primarily a LLMNR, NBT-NS and MDNS poisoner. But it also contains multiple authentication servers supporting various authentication methods, including SMTP! In fact, it contains all the following authentication servers and therefore it can capture credentials from any of these services:
- HTTP/HTTPS
- Kerberos
- IMAP
- POP3
- SMTP
- LDAP
- FTP
- SMB
- SQL
We could even use it in our 2nd example above instead of using Netcat! Anyway, for our purposes simply run it like this:
sudo responder -I eth0Now after the Responder is up and running, we can temporarily change the configuration in the ‘Email settings’ window and point it to our IP address. Then, after clicking the ‘Test settings’ button, we can see the SMTP credentials captured by the Responder:
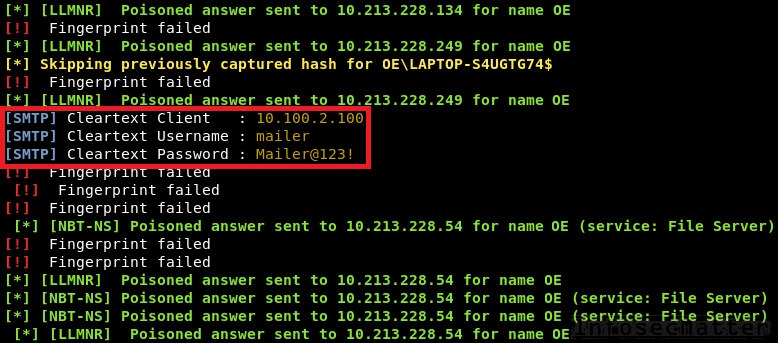
There it is, yet another disclosed password – probably a corporate domain account again.
Anyway, let’s talk defense now..
Remediation strategy
As penetration testers, we will be asked by our clients about how could they possibly defend their organizations against the aforementioned techniques. And we should be able to give them the best possible answers. The advice we give them should be holistic in nature.
As the first line of defense, the clients should of course immediately change the credentials for the compromised administrative interface and all the other consequently compromised credentials. One never knows who will read the report.
Next, a safe deployment guidelines should be developed and enforced within the organization. The guidelines should ensure that every new device or system installed into the network must have its default credentials changed immediately and according to the corporate password policy.
The corporate password policy should define passwords to be:
- strong (10+ characters) with lowercase letters, uppercase letters, numbers, and symbols
- unique for every system and device
- not in any public password dictionary
- ideally a passphrase
How to defend against password revealing attacks
First of all, the administrative interface should be modern and mature enough to never send credentials to the client browser. If it does, then it should be investigated whether there is an update for the management interface. If there is no update, then the administrative interface has to be isolated as much as possible from the rest of the network.
In any case the most effective defense is a proper network segregation and isolation. The principle of least privilege has to be strictly followed. All administrative interfaces should be:
- isolated and ideally placed in a separate VLAN
- reachable only by IT admins, possibly through a jump box
- not allowed to initiate any arbitrary outgoing connections
Conclusion
As we demonstrated above, there are multiple ways how to disclose credentials stored within administrative interfaces. The only requirement often times is really only to make sure that the remote host can reach our rogue honeypot server. If it can reach us, then there is practically nothing stopping us from capturing those stored passwords.
If you like this information and you would like more, please subscribe to our mailing list and follow us on Twitter and Facebook to get notified about new additions.
SHARE THIS


MOST VIEWED TOOLS