In this article we will look on how to install Nessus vulnerability scanner into a Docker container on a typical Kali Linux installation. We will also cover how to integrate Nessus with Hydra in order to give Nessus login brute forcing capabilities.
- Install Docker on Kali Linux
- Install Nessus into Docker
- 1. Get Nessus installation package (.rpm)
- 2. Create a Dockerfile
- 3. Build the Nessus Docker image
- 4. Start the Nessus Docker container
- Final check
- Start the Nessus Docker container after reboot
- Stop the Nessus Docker container
- Spawn shell in the Nessus Docker container
- Move the Nessus Docker container onto another machine
As the first step we have to make sure that we have Docker installed on our Kali Linux.
Install Docker on Kali Linux
Since Docker doesn’t come pre-installed on the Kali Linux, we have to install it ourselves. We will use Docker Engine Community (docker-ce) edition.
Official instructions on how to install Docker on Kali Linux do not exist, but do not worry. We have always had success using instructions for Debian (link) and assuming we have the latest Debian release (‘buster’).
The installation steps can be summarized into the following commands:
echo 'deb https://download.docker.com/linux/debian buster stable' >> /etc/apt/sources.list
curl -fsSL https://download.docker.com/linux/debian/gpg | apt-key add -

apt-get update
apt-get remove docker docker-engine docker.io
apt-get -y install apt-transport-https ca-certificates curl gnupg2 software-properties-common
apt-get -y install docker-ce

service docker start
docker run hello-world
Now we should have working Docker installation on our Kali box and we can proceed with installing Nessus into it.
Install Nessus into Docker
As a base system for our Nessus container, we will use Centos 7 Linux distribution. We will use Centos 7 because it has all the dependencies that we need. Namely we want to install Hydra tool and integrate Nessus with it. This will give Nessus login brute forcing capabilities during vulnerability scans. Nessus will be able to perform login attacks against various network services using supplied wordlists.
Note that in Centos 8 the Hydra package is not available. Therefore we have to stick with Centos 7. However, this may change in the future and in that case the steps below should work with very minor tweaks for Centos 8 as well.
Alright, let’s proceed.
1. Get Nessus installation package (.rpm)
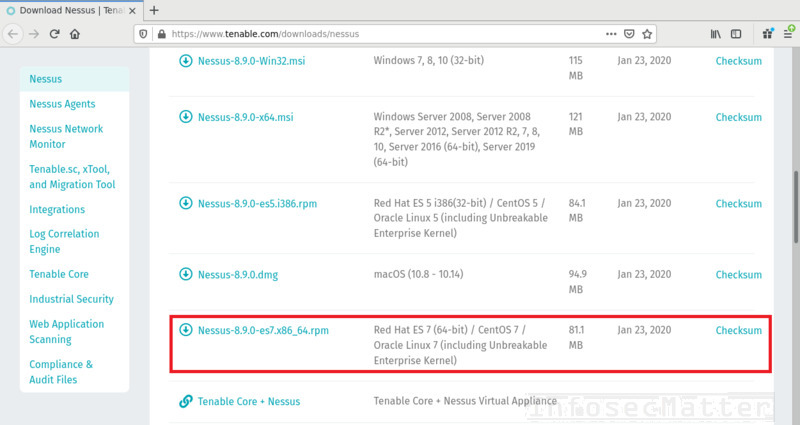
First we need to download the latest Nessus package from the official Downloads page (link). At the time of writing of this article the latest version was 8.9.0. Scroll down and download the installation file (Nessus-8.9.0-es7.x86_64.rpm) to your Kali box.
2. Create a Dockerfile
Next we have to create a Dockerfile. A Dockerfile contains set of instructions for building a Docker image. Let’s create the following file, make sure to name it as ‘Dockerfile’:
FROM centos:7
ARG rpmfile
COPY $rpmfile /tmp/nessus.rpm
RUN set -x \
&& yum update -y \
\
&& yum -y install net-tools lsof tzdata \
&& yum -y install https://dl.fedoraproject.org/pub/epel/epel-release-latest-7.noarch.rpm \
&& yum -y install hydra \
\
# Import Tanable's GPG key
&& rpm --import https://static.tenable.com/marketing/RPM-GPG-KEY-Tenable \
\
# Install the rpm
&& rpm -ivh /tmp/nessus.rpm \
\
# Cleanup
&& rm /tmp/nessus.rpm \
&& yum clean all \
&& rm -rf /var/cache/yum \
&& rm -rf /opt/nessus/var/nessus/{uuid,*.db*,master.key}
EXPOSE 8834
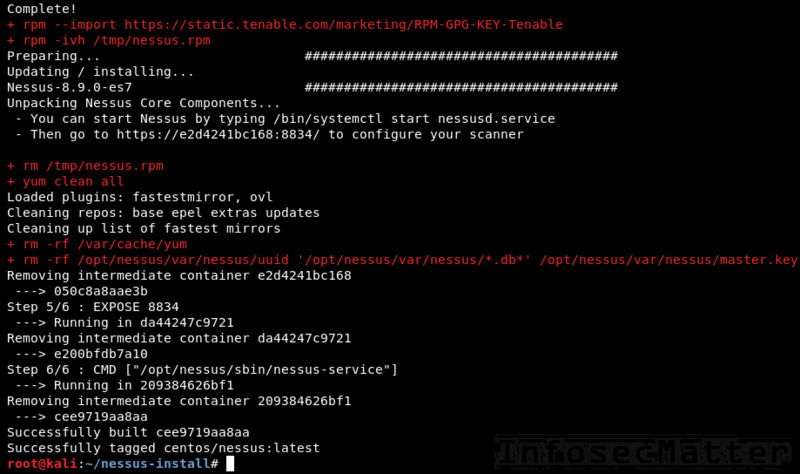
CMD ["/opt/nessus/sbin/nessus-service"]Now this is what we should see on our computer:

3. Build the Nessus Docker image
Once we have everything prepared, we can build the Nessus Docker image using the following command:
docker build -t centos7/nessus --build-arg rpmfile=Nessus-8.9.0-es7.x86_64.rpm .The building process will typically take a few minutes. After the building process is done, we should see something similar to this:
4. Start the Nessus Docker container
We are almost done. We have successfully built our Nessus Docker image and now we can start a new Docker container using that image. Note that we will assign a custom MAC address to the container. This will allow us later on to backup the container and move it to another system, if needed. This is very useful when we want to use Nessus without internet access, for instance.
Alright, let’s start it up using this command:
docker run -d --name nessus -p 8834:8834 --mac-address 00:0c:16:12:34:56 centos7/nessus /opt/nessus/sbin/nessus-serviceAnd that’s it! Now the container should be running and we can open https://localhost:8834/ and activate our new shiny Nessus instance.
Final check
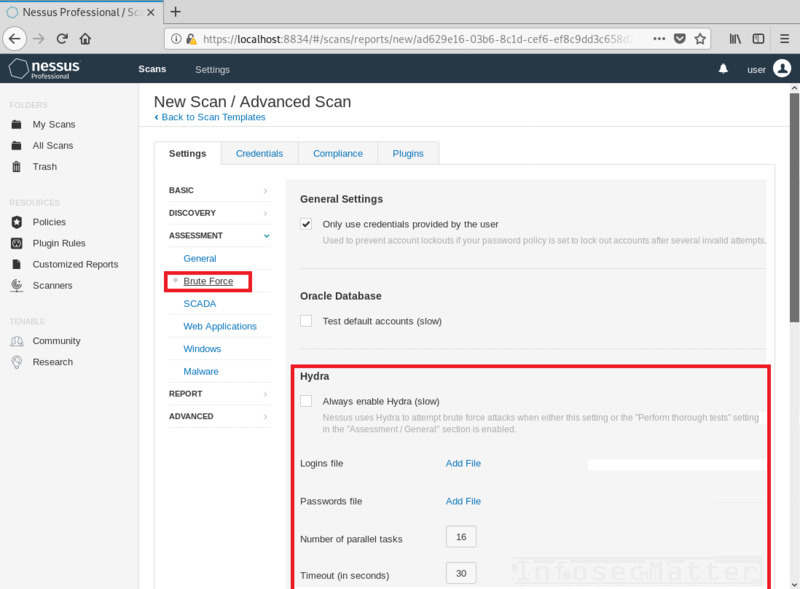
After the activation and consequent compilation of plugins, we can login to it and start using it. To make sure that the integration with Hydra was successful, we should see Hydra being available in the scan configuration window under the ‘Brute Force’ sub menu, like this:
If everything went well, congratulations! We now have a fully dockerized Nessus scanner integrated with Hydra! To see what all you can do with it, check out our detailed overview.
Now let’s have a look on some of the common maintenance tasks.
Start the Nessus Docker container after reboot
Suppose you rebooted your machine and now you need to bring the Nessus docker container back up again. Don’t worry, all your scan results are still there. Simply bring it up like this:
# start the docker daemon
service docker start

# get CONTAINER ID of your Nessus container
docker ps -a

# start it up, e.g.
docker start 3802b0b61d8b
Now you can go back to https://localhost:8834/ and use it again.
Stop the Nessus Docker container
Typically there should be no need to stop the Nessus docker instance. We usually have it running all the time. But in case you need to stop it (e.g. restart it), you can do it similarly as with any other docker container using ‘docker stop’ or ‘docker kill’. Example:
# get CONTAINER ID of your Nessus container
docker ps

# stop it, e.g.
docker stop 3802b0b61d8b
That’s it. Now the container should be stopped. You can then bring it up again with ‘docker start’, as shown previously.
Spawn shell in the Nessus Docker container
Sometimes you want to inspect and “log into” a running docker container. Well, we can perfectly do that with our Nessus container. To spawn a shell in it, simply run:
# get CONTAINER ID of your Nessus container
docker ps

# execute interactive shell in your container
docker exec -i -t 3802b0b61d8b /bin/bash
Now you can check if everything is alright inside the Nessus docker container. After you exit the shell, don’t worry, everything is just fine – Nessus is still running.
Move the Nessus Docker container onto another machine
Suppose your next client is very sensitive. The client doesn’t allow you to use your own computer for the engagement. You cannot bring your laptop with you and on top of it there is also no Internet. You basically need to use Nessus without Internet access. What can you do? Easy. You simply export the Nessus container and copy it on a USB flash drive. Then you bring the USB flash drive with you to the client and import it there. Here are the steps how to do that.
1. Export the container
To export a running Nessus docker container, use the following commands. Note that we will also compress it:
# get CONTAINER ID of your Nessus container
docker ps

# export it and compress it
docker export 3802b0b61d8b | gzip > nessus_docker.gz
Afterwards, transfer the ‘nessus_docker.gz’ file on the allowed USB stick and bring it to the client.
2. Import the container and start it up
Now at the client site simply copy the file on the provided machine with prepared Docker installation. Then you can import it and start it up using the following commands:
# uncompress it and import it
zcat nessus_docker.gz | docker import - centos7/nessus

# start it up
docker run -d --name nessus -p 8834:8834 --mac-address 00:0c:16:12:34:56 centos7/nessus /opt/nessus/sbin/nessus-service
As you can see, we have used the same command and MAC address to start it up as when we originally built it. Using the same MAC address will allow us to use the Nessus on another system without any problem. Note that you should never use both Nessus instances in parallel at the same time. That would be a licensing violation which can cause your license to be revoked.
If you like this guide and you would like more, please subscribe to our mailing list and follow us on Twitter and Facebook to get notified about new additions!
SHARE THIS


MOST VIEWED TOOLS